A high-speed hair dryer relies on steady airflow to work as intended. Dust, lint, and loose hair can collect around its filter, especially when the dryer is used near towels or stored in a bathroom. You may notice weaker airflow, more noise, or a casing that feels unusually warm. These signs can have other causes, so they do not prove the filter is clogged. Still, the filter is a sensible place to check.
This guide explains how to clean a high-speed hair dryer filter without guessing at parts or forcing them loose. Filter designs vary: some covers twist off, while others stay attached. That distinction matters. Before cleaning, unplug the dryer and let it cool completely. Check the manufacturer’s instructions for your model, including whether its filter or cover can be removed and whether any part may get wet. For many dryers, a soft, dry brush or cloth is a safer starting point than rinsing. Small details matter. Avoid sharp tools, hard scrubbing, and spraying liquid into the dryer; trapped moisture or damaged mesh can cause trouble. If the cover resists, stop rather than pry it open. A few minutes of careful cleaning may help restore clear airflow, but it cannot fix every performance issue. If overheating or weak airflow continues, stop using the dryer and contact the manufacturer or a qualified service professional.
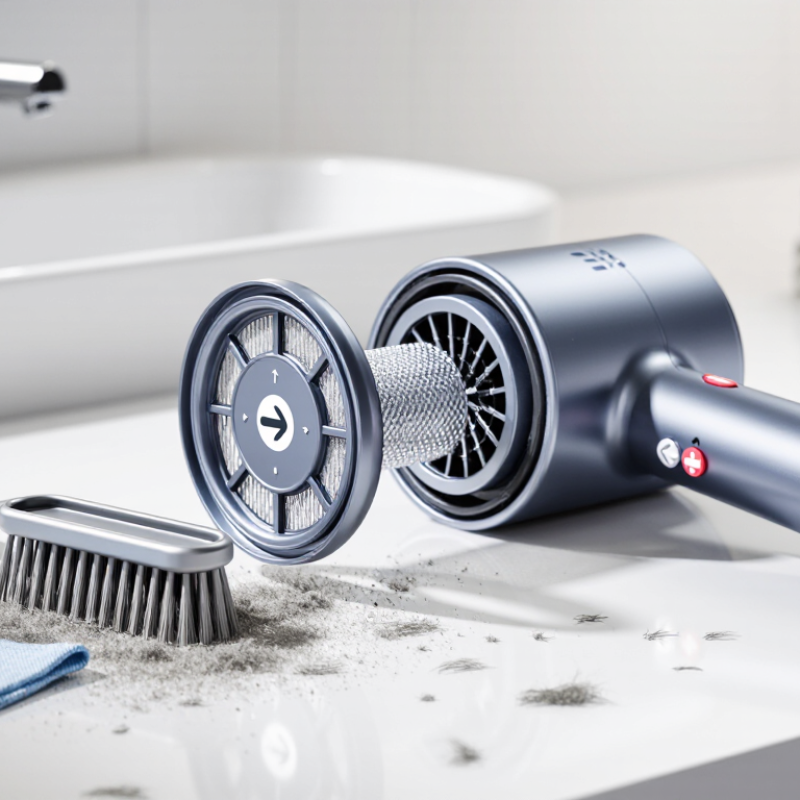
Identify the filter before cleaning. On most high-speed hair dryers, it sits at the rear intake, where air enters the handle or body. Look for a fine mesh screen beneath a circular or slotted cover. The cover may twist, slide, or release with a small latch; do not force it. Some models use a fixed grille, while others have a removable filter assembly. Check the model’s user manual before turning anything. IEC 60335-2-23:2021 covers the safety of skin- and hair-care appliances, but it does not set one universal filter shape or removal method.
With the dryer unplugged and cool, examine the rear under bright light. A grey lint ring, trapped hairs, or a dusty mesh usually marks the filter—not a decorative vent. Photograph the assembly before removing it; small tabs are easy to misread. If the cover comes off, note how its grooves and locking points align. Don’t poke the mesh with a pin or sharp tool; even a tiny bend can leave a gap. A soft, dry brush is a safer first check. I used to assume every rear cap twisted off. That was a poor guess. If the cover resists, stop and consult the manual rather than testing its strength.
Before cleaning a high speed hair dryer filter, switch the dryer off and unplug it from the wall outlet. Do not rely on the power button alone. Let the appliance cool completely on a dry, stable surface. Let it cool fully. The handle and rear housing can stay warm after the airflow stops, so wait until they feel cool to the touch. I find this pause easy to skip when I am in a hurry, but handling a warm dryer makes careful cleaning harder. Check the user manual for the filter’s location and removal method, since designs differ. Never pull or twist a filter that feels stuck.
Once the dryer is cool and unplugged, remove the filter gently, following its instructions. Brush away lint and dust with a soft, dry brush, working over a clear surface so debris does not drift back into the intake. Avoid sharp tools and do not rinse the filter unless the manual says it is washable. If washing is permitted, let it dry completely before reinstalling; even a little moisture can be a problem around an electrical appliance. Inspect the mesh for damage, too. I sometimes miss dust caught along the edge, so a second look under good light is worthwhile. If the filter will not come off easily, stop and check the manufacturer’s guidance rather than forcing it.
Before touching the filter cover, switch the dryer off, unplug it, and let it cool completely. A warm housing can be uncomfortable to handle, and rushing may damage small plastic tabs. Check the user manual for the cover’s location and removal method. Designs differ: one cover may twist off, while another releases with a latch. No guesswork.
Follow the manufacturer’s steps in order. Place the dryer on a stable, dry surface, then hold it firmly while releasing the cover. If the instructions say to press a tab, use gentle pressure at that point. Avoid screwdrivers or other tools unless the manual specifically recommends them. A small crack can make the cover fit poorly later.
Set the removed cover on a clean cloth and note how it was positioned. This makes correct replacement easier. If it resists, stop and check the instructions again; forcing it is not a useful test. It is tempting to apply a little more pressure, but that can snap a clip. If the release method remains unclear, consult the manufacturer’s support guidance before continuing.
Fine dust and loose hair can collect around a high-speed hair dryer’s air-intake filter. A restricted intake may reduce airflow and make the appliance feel unusually warm. Check the user manual before cleaning; filter designs and approved methods differ. If the manual is missing, look for official care instructions for the exact model rather than guessing.
Unplug the dryer and let it cool completely. No rush. Place it on a dry towel under bright light. Remove the filter cover only if the instructions say it is removable. Use the specified brush or a soft, dry cloth to lift visible lint, working gently around the mesh. Don’t press hard; bent mesh can be difficult to restore. Hold the filter over a bin, then wipe away residue with a clean, dry cloth. Avoid water, cleaners, sharp tools, and compressed air unless the instructions expressly approve them.
Check the filter’s edges, where dust can cling in a thin ring. It’s easy to miss. Refit the cover as directed, making sure it sits securely before using the dryer. If debris is packed into the mesh or the filter looks damaged, stop and follow the manual’s service guidance instead of scraping it clean.
After rinsing a washable filter, shake off loose water and blot it gently with a clean towel. Don’t twist the mesh; it can stretch or tear. Set the filter on a dry towel in a well-ventilated place, away from direct heat. It may look dry before the inner layers are ready. Wait until every part feels completely dry, with no cool or damp spots. If the care instructions say not to wash the filter, use a soft, dry brush instead.
Before reassembly, check the filter and its housing for lint, cracks, or trapped moisture. Slide the filter back into its original position and make sure it sits flat, without gaps. A loose fit can let dust enter the dryer. I used to assume a filter was secure if it clicked once; checking the edges is wiser. Plug in the dryer and switch it on briefly at a low setting, pointing it into open space. Keep hair, towels, and loose items clear of the air intake. The airflow should feel steady, not unusually weak or uneven. Listen, too. If you hear rattling, smell anything unusual, or notice the dryer getting hot quickly, switch it off and unplug it. Recheck the filter’s fit before using it again.
It is usually at the rear air intake, beneath a mesh screen or cover. Some models have a fixed grille.
Look for lint, trapped hairs, or dust on a fine mesh. Check the manual if the cover’s purpose is unclear.
Yes. Switch it off and unplug it from the wall. Wait until cool.
Follow the manual’s instructions. Covers may twist, slide, or release with a latch. If it resists, stop; don’t force it.
Use a soft, dry brush over a clear surface. Avoid pins and sharp tools, which can bend or damage the mesh.
Only if the care instructions say it is washable. Otherwise, brush it dry. Let washed parts dry completely before reinstalling.
Align its grooves and locking points, then check that it sits flat with no gaps. I once trusted a click alone; checking the edges is better.
Switch off and unplug the dryer. Check the filter’s fit and look for trapped lint or moisture.
Test briefly on a low setting, pointing into open space. Stop if you hear rattling, notice an unusual smell, or feel rapid heating.
Knowing how to clean a high-speed hair dryer filter helps keep airflow steady and the appliance working efficiently. First, locate the filter and its cover, then switch off and unplug the dryer. Let it cool completely before handling any parts. Check the manufacturer’s instructions to learn how to remove the filter cover safely, since designs can differ.
Gently clear dust and debris from the filter using an approved cleaning method, such as a soft brush or another method specified in the care instructions. Avoid forcing or damaging the filter. Make sure it is fully dry before reinstalling it, then secure the cover as directed. Finally, turn on the dryer briefly and check that air flows normally. Regular inspection and careful cleaning can help prevent buildup and support consistent performance.